by Jamie Pike
I am, to the core, a commercial tyer. While I do stray from the hours upon hours of repeating the same pattern typically ranging in sizes 2-4-6-8-10 (typical here for Atlantic Salmon wet flies and dry flies), and tie some one-off patterns, the bulk of my vise time is spent fulfilling requests from customers around the globe. I have been fortunate enough to have been given some guidance from great fly tyers over the years, and I will share with you some tricks and tips to make your flies not only last for multiple fish, but for multiple seasons!
The first thing that I determined throughout the years of tying is that not all materials, vises, and tools are created equal. While I do not believe that you need to blow the budget on the most expensive things you can lay your hand on, there are quality manufacturers and distributors out there, so I bit the bullet, spent some extra money on quality kit, and in the end, it has paid off.
With your selection of tools and hardware, it’s onto hook and shank selection. I’ve tied on numerous brands over my time at the vise and have settled on Partridge Of Redditch and Sprite Fishing as my go-to brand of choice. These brands offer everything from coarse/carp, predator, trout, salmon, barbed/barbless, saltwater, singles, doubles, shanks…trust me, if you want it, they have it. The hooks are strong and consistent and the size range in each model is more than adequate. For my commercial tying, spending the money on a tried and tested brand adds to the life and value of the flies that I sell to customers.
In the next section I will show you some tips and tricks that will make your flies last!

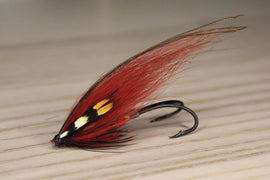
A wet fly typically has 9 parts. Tag, butt, tail, skirt, rib, body, wing, throat/collar, and head. Sure, within this formula there are countless additions of hackle, flash, married wings and the like, but let’s start basic. You can then build from there and take these simple steps to the next level.
Material Selection: As with most things, and previously mentioned - all are not created equal. Most brands share similarities across their SKU list, however there are some, that, in my experience, offer a more durable/quality proven/tyer friendly product. For most of my materials I have chosen SHOR Fishing. These are available coast-to-coast in Canada in fine retailers, and locally, at Atlantic Rivers Outfitting Company who will ship nationally and internationally. Check ‘em out…tell ‘em Jamie sent you 😊

Tag : The tag is typically tied using mylar or oval French in a variety of colours. For durability and longevity I have found (and my customers have relayed the same) that a tag tied with mylar affords more fish attracting qualities and does not “open up” like oval French, and the mylar deflects light and gives the fish more of a target.
Butt: The butt of the fly is tied typically using either a stretch material or floss (I’ve used both) in a wide range of colours. I like material that is easy to work with and that lays flat (no one wants a lumpy butt).


The key here with securing the butt of the fly and having it last for multiple fish is to create a “hood” by leaving an inch or so of the material behind, then forming the butt, and pulling the tag end over the top of the butt creating a hood. This keeps the butt material from fraying and getting pulled down over the tag of the fly, and eventually pulling apart, and slowly having the fly fall to pieces.

Tail: Standard tails are tied from pheasant crest. It would be more budget friendly to use a schlappen, however, the fibres on schlappen are very soft and are easily torn and broken off. If a particular pattern calls for a tail other than the popular yellow/gold; I will purchase pheasant crest in the required colour, or dye one myself. An aggressive strike sometimes results in the fly farther inside the mouth of the fish. Sharp teeth can reek havoc on your fly, and soft schappen can easily fray. The pheasant crest will give you a better chance of the fly lasting.
Skirt: I like using ostrich herl over peacock eye or herl. I find the ostrich needs less reinforcement and is available in a range of colours to offer an attractive contrast to the fly. All you need is a few wraps and reinforce with your thread (small diameter).

Rib: Local rules dictate no weight added to the fly which eliminate wire for the rib here in Newfoundland. My most used is oval French in gold or silver, however I have used vinyl d-rib in size xs when looking for a coloured option. Some other recipes call for embossed tinsel, mylar etc, but my most used material is oval French. When tying in the French, start at the end of the return, helping create a smooth and consistent body of the fly (the rib is tied in before the body) , and when wrapping over the body, either a steady hand, or, in my case, the rotary function of the vise lays the rib on nicely. A side note here, I lay the rib on opposite of the direction I lay the body material. For example, if I wrap my body material over the top of the hook, I wrap the rib under the hook. Doing so ensures the rib material does not sink down into the body material and limiting the visibility to the fish.

Body: Regardless of what you’re using for the body of your fly there are several steps to ensure a consistent and smooth body, appropriate proportion, shape, and length. It’s easy to overdo it and too many wraps of material will quickly result in too much bulk. Obviously, the size of the hook you’re tying on will greatly determine material length, so I won’t get into “cut x amount from your spool and firmly secure”. At this point you have a couple of options. From a commercial tyer stand point (because time matters) I like to snip the desired amount of material from the spool, wrap it around my tying thread leaving 2mm of space to the tie in point (which is immediately behind the return junction) then have touching wraps rearward to the skirt, then slightly overlapping wraps forward to the end point (again at the return junction).

These wraps should be tight as to not allow material slippage rearward, or allowing the rib material to sink into the body thus decreasing the attracting quality.
Once the body is finished, just a few thread wraps will secure it.
Wing: Wing material greatly varies, and the popular choices for Newfoundland fly tyers are calftail, kid goat, moose body and squirrel. It doesn’t matter how perfect you’ve completed the previous steps, if you fail to tie in a strong wing, you’ve set yourself up for disappointment, and good lukc having a return customer when the wing of the fly disappears when they’re casting. A small dab of superglue, zap-a-gap, or loktite under the wing will work wonders. I opt for LePage super glue. Snip your wing material and pull any underfur away and discard. Stack the hair neatly, measure the desired length, snip the ends, then rather then tie the wing material all in together; take 2-3 smaller segments with tight thread wraps. This will ensure the wing will last and not fall apart from casting, or from a fish strike.

Throat: For the throat material, as mentioned previous, I stray away from schlappen and tend to predominantly use hen saddle dyed in various colours. Choose a feather that offers an appropriate length fibre for the throat. Pull fibres toward the stem lining them up, then tightly pinch a clump and pull from the vane.
When tying the material in, rotate your vise 180 degrees, then hold the material securely and catch with thread making sure when you wrap it doesn’t pull the material around the side of the head. Again, just a couple of wraps is all it takes to secure the material. When tying in the wing and throat, a strong, small diameter thread keeps the size of the head appropriate, and tightly grasps the fibers. Once complete, 2 sets of 3 whip finishes and you’re almost complete.
The final step is finishing the head with sealant. Most often I use clear cement. I have 2 bottles in close reach - one being a very thin to allow seepage into the thread to create a very secure wing and sturdy head. The second being a thicker top coat. Ill apply 2 coats of the thin, then 2 coats of a thicker variety.
I hope you’ve found this helpful. Follow my facebook page The Perfect Presentation, and on Instagram @theperfectpresentationnl.